So has everyone been hopping through the awesome blogs and enjoying the gorgeous tutorials? Have you stopped by Ellison Lane and entered the awesome fabricworm giveaway? After all the awesome ladies before me, I’m a bit intimidated to present my tutorial to you, but hopefully, you’ll find something here that is useful to you 🙂
If you want to check out all the other awesome blogs, just follow the list!
Friday, October 14- Jennifer @ Ellison Lane Quilts
Saturday, October 15- Ayumi/Pink Penguin
Sunday, October 16- Amy/ Lots of Pink Here
Monday, October 17- Faith/Fresh Lemons Quilts
Tuesday, October 18- Penny/Sew Take a Hike
Wednesday, October 19- Kati/From the Blue Chair
Thursday, October 20- Lee/Freshly Pieced
Friday, October 21- Elizabeth/Don’t Call Me Betsy
Saturday, October 22- Melanie/Texas Freckles
Sunday, October 23- Lindsay/Craft Buds
Monday, October 24- Amanda/A Crafty Fox
Tuesday, October 25-Vanessa/Little Big Girl Studio
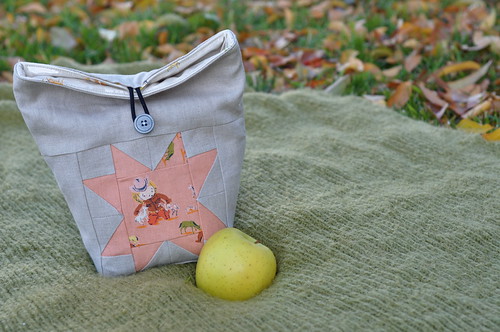
Ever since Sewing Summit, I have had the other Amanda‘s concept of mini quilts on the brain. She said she likes her minis to tell a story, a simple concept. So I paired that with a simple, sawtooth star and came up with this little lined zakka-style lunch sack. We are going to use some upcycled vinyl so that any fabric can be used for the lining and it will still be waterproof and easy peasy to clean! I made it using linen and Heather Ross Far Far Away III, but it could easily be adapted for a little boy or even a grown up (I am going to make one for my darling hubby who is so good about taking his lunch to work)
To make this lunch sack, you are going to need:
1 FQ Linen or Background
Large scrap of focus fabric for star
1 FQ for Lining
Upcyclable piece of vinyl (or purchased from Joanns)
13″X 22″ piece of Insulbright (or batting, if you prefer)
Button, Needle, Thread
Pins and notions (I
Lets get started!
Cut:
(2) 3.5″ ‘fussy cut’ squares from your focus fabric
(8) 2.5″ linen squares
(8) 2.5″ focus fabric squares
(8) 2″ squares of linen
(2) 2.5″x 6.25″ pieces of linen
(2) 3″ x 10.5″ rectangles of linen for the below the star
(2) 4.5″ x 10.5″ rectangles of linen for above the star
(2) 10.5″ x 12.75″ from lining fabric
(2) 10.5″ x 12.75″ from vinyl
(2) 10.5″ x 12.75″ from insulbright
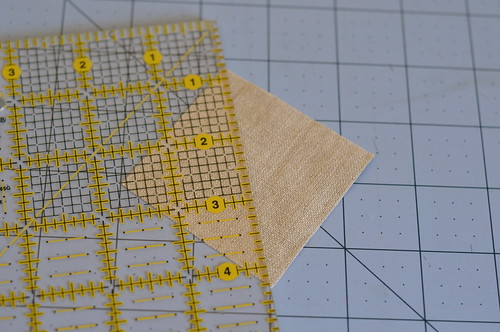
Whew! Now that’s done, let’s make our star! Start by making 16 Half Square Triangles using the 2.5″ inch squares. Draw a diagonal line corner to corner on the back of the linen, match up with the focus squares and sew 1/4″ on each side of the line. Snip apart and press!
Sew the HST’s into pairs. On four of the pairs, add the solid 2″ square at either end. Like so:
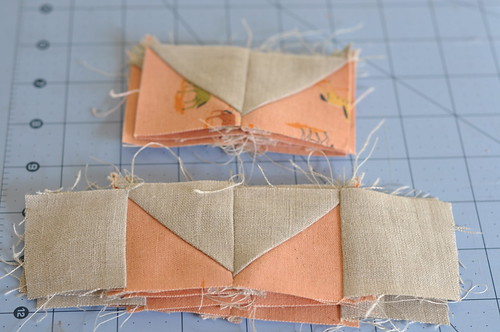
Sew the short pairs onto the 3.5″ fussy cut square. Then, sew the the longer pieces onto the empty sides of the 3.5″ squares.

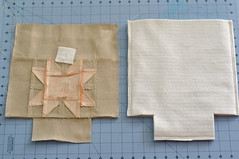
Next we are going to assemble the outer shell of the lunch sack. Sew the 2 2.5″x 6.25″ to either side of the star. Then, place the 3″ strip on the bottom, the star strip in the middle, and the 4.5″ piece on the top. Sew together.
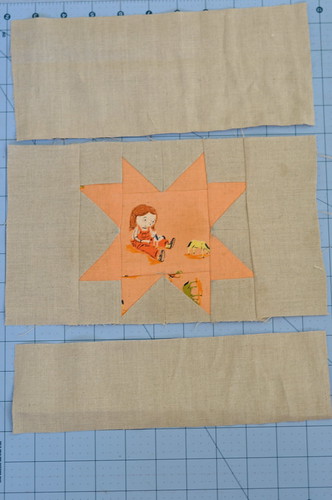
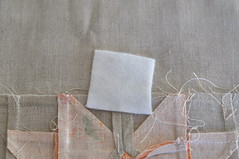
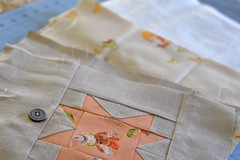
Once they are assembled, make a small mark on one of your outer shell pieces in the middle, right above the star. Iron a small piece of fusible interfacing on the back of the fabric, then affix your button on that mark.
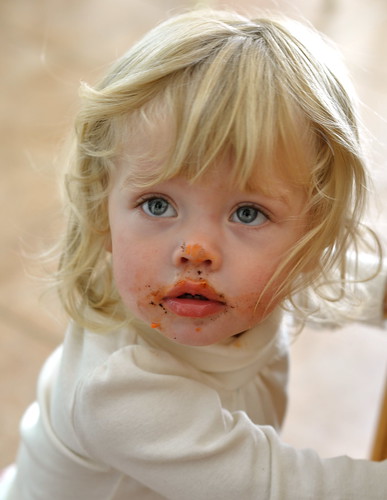
I then bribed my little helper with Halloween Oreos to go play in the other room. And if one or two delicious cookies happened to slip into your sewing room, you won’t tell, right? 🙂
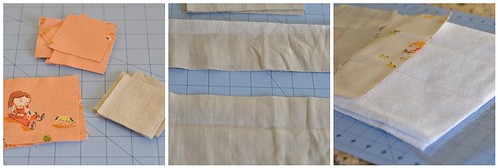
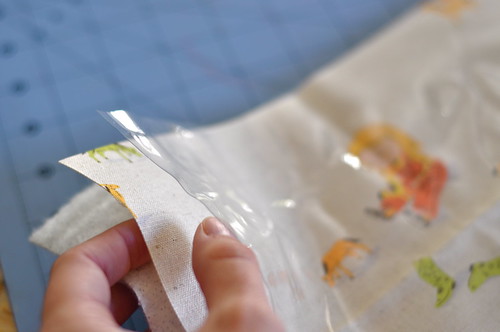
Now, we are going to assemble the lunch box. Gather your lining fabric, vinyl, and insulbright.
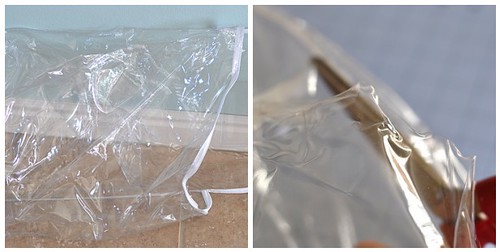
****NOTE: I sourced my vinyl from my linen closet. I have several of these vinyl zipper pouches that sheets come in laying around. I simply cut it along the seams with scissors, pressed out the wrinkles by laying some flannel on top and pressing with a hot iron. I would NOT recommend placing your hot iron directly onto the vinyl****
Layer your three lining pieces like this:
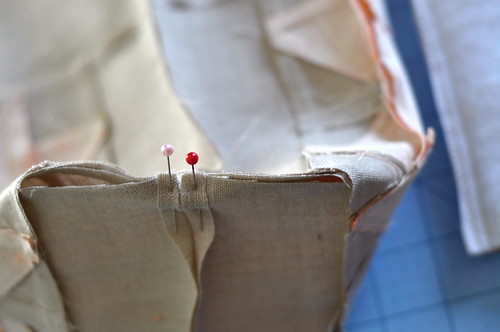
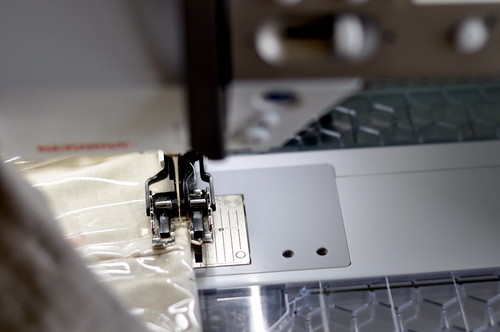
I pinned these three together and zig zag basted around the edges, just to keep the vinyl from slipping all over the place. You will do this twice, once with each set. Then, I placed them vinyl sides together and sew the sides and bottom together. Do the same to the outer shell by placing the two pieces right sides together and sew the bottom and sides together. Move to your cutting board, and cut and 2.5″ square out of each bottom corner.
Now, fold the bottom corners so that the side seam touches the bottom seam and pinch and pin it. Sew a generous 1/4″ from the edge (I reinforced the seam with a zig zag as well)
Do this with all four corners.
Now for the fun part. Leave your outer shell piece inside out. Turn the lining right side out. Place the lining inside the outer shell. Place pins around the outside, remembering to leave a 3-4″ gap (on the opposite side to the button!) to pull it all through in the end.

Sew about 1/2″ from the edge, leaving your gap. Pull lining and outer shell through the gap. Stuff the lining inside of the outer shell.
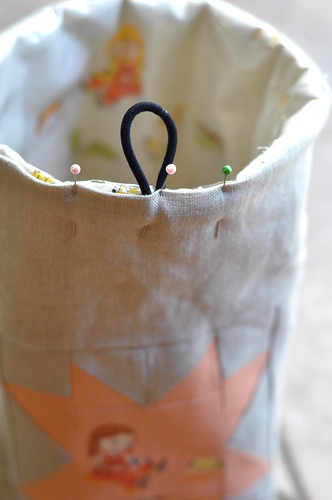
Pin a piece of elastic (I used a {new} hair elastic) into middle of the gap, and tuck the raw edges in. Pin. Top stitch around about 1/8″ from the edge.
Now, Voila! You have a finished lunch sack all ready to be wrapped up for Christmas! Yay, you!
On to the giveaway. Many of you know my husband and I run a little shop, WestWoodAcres on etsy. It is a fun hobby for us and we want to give away a $30 gift certificate to one lucky reader! To enter, just leave me a comment on this post telling me what you or your little ones are going to be for Halloween. This mama has no idea what to do for her toddler!
Followers (new or old) will get an extra entry if they leave a 2nd comment.
I’ll pick a winner using random.org on Wednesday , October 26th (although we have a halloween party that night, so I may not get to it until Thursday!)
Thanks for stopping by! Feel free to ask any questions in the comments as I try and reply to everyone!

My 11 month old doesnt have a costume yet…Guess I had better get crackin!
Thanks!
By the way, I love the little bag…very cute!
Patrick
We don’t really do halloween in our family, so no dressing up here but we do still eat the chocolate and candy! yum.
I subscribe to your blog via google reader. I read every update you post!
Love the tutorial.
Sorry I guess thatwas a bit of Murphy’s law with my timing before.
My son is going to be a shark for Halloween.
Thanks for the giveaway
Subscribed to your blog through GoogleReader.
Can’t wait to check out your shop.
Great idea for a gift! No kiddies yet, but I’m working on superhero costumes for our two pups. Seriously!
Great tute! Thank you for sharing!
I have no little ones of my own, but I do like to help my niece with her costume. This will be the first year that she will NOT be trick or treating (she is 12 – so very grown up now, you know!), but she will be going to a party. She is going to be a Day of the Dead Catrina because she loved the makeup she saw on Pinterest. I look forward to painting her up!
I am a new follower of your blog (but an old follower on Facebook!).
PS: check Pinterest for toddler costume inspiration. There are SO many adorable ideas there!
My two year old boy will be dressing up as a dragon for Halloween. Even though the costume is one I’ve seen lots of, he still looks ridiculously adorable in it!
Love the lunch sack, it’s adorable!
I follow your blog via google reader. Thanks for the tutorial and giveaway! Great tip about saving those bags that blankets and sheets come in, I’ll definitely be keeping that in mind!
what a great tutorial! i think i may use this for a few super special little bits of heather ross fabric i have been hoarding. thank you!
my three-year-old is going as a ‘red dragon.’ it’s a hodgepodge costume – thrifted red swimsuit, devil horns, devil tail, giant red pettiskirt, red angel wings. red shoes. it’s a sort of loose interpretation of dragon, but she loves her costume and of course she is smashing in anything. 🙂 my 3-month-old has a ‘super baby’ onesie complete with cape, so she’ll be in that.
i am a follower!
I have 4 girls and one will be
snow white one will be a bat, one a butterfly and one will be superiors. It:s going to be so much fun!
Hey! That is a pretty cool lunch sack! Thanks so much for the idea, this would be a great gift for students going to school to keep their drinks cool or fruit cold even! Thanks for the share!
My kids are big so no trick or treating. My son and girlfriend are going to a party as the couple from nightmare before Christmas. I think that’s what he said….
Wanted to come back and post that I am also following you on your blog, the only way I knew how to do was by joining your “Lets Be Friends” section. Can’t wait to see more posts from you! 🙂
Thanks again!
I’ve saved those vinyl bags but haven’t really had a plan for them, so it’s great to have this tutorial to make use of them! I have made several black or red capes for my kids over the years – they can be anything from Dracula to Little red riding hood just by throwing on a cape and a bit of makeup!
I am already a follower of yours – thanks for the chance 🙂
Love the way you recycle the vinyl to use in the bag. That is such a great idea. And the lunch bag is terrific. Thanks for the tutorial.
We just don’t do Halloween like you guys, and I am beginning to see that we are missing out! Shops bought witches and a wizard may be in order x
I saw a picture the other day of a toddler dressed up as a lego blog. It was so darn cute. They used a box and six, red plastic cups. I think they cut the cups down a bit and attached them to the box. The hat, or top, was a smaller box, just the top and a little, tiny bit of the four sides with 2 cut off cups. All was sprayed red, but you could use any color. Thought I’d share that idea with you since you hadn’t decided on a costume for your toddler yet. That little girl of yours is sure cute with oreo crumbs on her nose!
I became a follower. My blogger name is booklogged.
My toddler is going to be a spider, my bigger kids are going as Anniken, Darth Vader, a cat and a pumpkin. I have no idea what I am going to be!
Well, my little ones are all grown up. Not sure what they’ll do for Halloween, but they both have jobs (yay!) so probably nothing on the 31st. Hubby and I will be home to hand out treats to the neighborhood kids. I checked out your shop — lots of goodies there!
We don’t really go trick or treating, but my boys love to dress up as pirates.
Have fun at your party
I looked at your shop and enjoyed seeing all the fabrics you carry! Thanks for the give away!!
This is a great tutorial and I love love the end result. Thanks for the tutorial AND the amazingly generous giveaway.
I`m already a follower!
I love this tutorial. Thanks for posting it. My daughter (who is no longer a little one – 16 now) has been wanting a lunch “box” and this one is perfect. As far as Halloween…I’m not sure about her but I am thinking about making myself a scrunchie costume. You know those things you use in the shower?! A sweatshirt and sweats and a bunch of tooling and then a wired rope on my head. Just a thought at this stage but I guess I better get busy. Thanks for the chance to win.
I am a new follower.
Kids are all grown up so no costumes here. Just plenty of candy.
What a cute lunch bag! We don’t get into halloween so I can’t really help you out on that one!
I am a faithful follower!
let’s see here.. my son is going to be super mario, my older daughter is going to be a pirate, and my little daughter keeps changing her mind every 2 minutes. maybe a ballerina, maybe a cat….
I follow your blog. Thank you for the giveaway.
i’m also a new follower 🙂
We don’t really do Halloween in the UK!! and anyhow mine are a bit old for dressing up now!
Your daughter is such a cutie!!
I’m already a follower!
I love this lunch bag! It’s adorable! Thanks for sharing!
My daughter is now 14 and has decided that she is tooo old for dressing up! Darn it! If I were to dress up this year though, I would love to be a bumble bee!
I now follow your blog!
My 6 yr old wants to be Mary Poppins or Shirley Temple. My 2 yr old will be whatever she picks out of the dress up bin on Halloween! 🙂 Such a great tutorial. I just got a new sewing machine and will have to give it a try!
I follow you on FB.
What a sweet little lunch bag! My husband is also so good to take his lunch every day to work. I’ll need to dive into my stash of “manly” fabric. Sorry my kids are all grown up now so there will be no costumes this Halloween but I remember sometimes scrambling near the end to come up with an idea. My costume making days are some of my fondest memories of mommy-hood.
My daughter is going to be a witch. We made a purple tutu for her skirt- I couldn’t believe how easy they are to make. My 1 year old boy is going to be a puppy, I found his costume at the thrift store last week and was thrilled. I had no idea what I was going to do for him, this made it easy 🙂
Since my “little ones” are aged 42 and 40, I won’t be doing anything special with them. However we will be answering the door to lots of local children all dressed up and hoping for treats.
Nice tutorial! Thank you! My son will go as a dad to his four kiddos, my older daughter will go as an 80’s prom girl, and my younger daughter was looking for her black dress for something or other!
I now follow you with Google Reader!
No kids here but hubby and I will be going to a friend’s party on Saturday. Thanks for the opportunity to win.=)
great idea to use the vinyl packaging you already had!
We don’t celebrate Halloween here. So I have no idea, sorry! Thanks for the lovely tutorial!
i am a follower of your blog!
We don’t celebrate Halloween, sorry. But I love this tute. The fabric is adorable!
I am going to be the lady in the witches hat handing out candy to the few kids that trick or treat in our neighborhood…we live in the country in an addition, kids are growing up, as well as grandkids and nieces and nephews. Thank you for the tutorial.
I am a new follower on facebook. BTW, your little helper is ADORABLE!
Very cute lunchbag. I’m all out of children, but I have stocked up on a bucket of gummy sweets should anyone drop by (like the toddler downstairs)
I already follow you through Blogger
What a precious little lunch sack! And such a great idea using the vinyl from those sheet bags! Genius! Thanks for sharing your marvelous ideas with us. 🙂
I am also a follower!
I have no little ones at home anymore and the grandkids live two states over. We will be handing out candy to all those that knock on our door. Thanks for the great tutorial and for the opportunity to enter your giveaway!
not quite sure yet…!
i am a new follower
My little boy’s going to be a puppy dog. Thanks for the tutorial.
My 5 year old fell in love with a Luke Skywalker costume at Target AFTER we bought the material to make him a Jawa costume – not what I was hoping for but Halloween is about his fun not mine. 🙂 My 17 mo twins don’t care for anything over/around their heads and it is hard to have a costume that isn’t dependant on it’s head “gear” so we are still up in the air for them.
very cute bag – love the Heather Ross you used in the middle of the star! We tried a monkey costume for my 2 year old who LOVES Curious George but no luck, so now we’re trying Angelina Ballerina, the other favorite. If that one doesn’t stick she’s just going to have to go as a picky 2 year old 😉
I am a follower and I LOVE this tutorial.
Love this tutorial–especially with the vinyl! My little boys are going to be puppies for Halloween.
What a great tutorial. I’ve saved those zippered vinyl bags myself because they are just such nice bags with thick vinyl. I was sure they’d be good for something. And the zippers on them are nice and long as well so I figured they will be great for something as well some day. Thank you for the awesome tute and you have nothing to be feeling intimidated over. You did a beautiful job on this.
Halloween ~ I am thankfully beyond the yearly struggle to come up with a fabulous costume idea. I had three boys so it always felt like such a struggle to come up with ideas. There are SO many adorable little girl costumes shown each year and back when my boys were little, the boy ideas were just not that prevelent without *gasp* buying those icky store bought costumes which I absolutely refused to do.
I am also a new follower of your blog.
this lunch bag is so sweet! this year, we have a snow princess, harry potter, thor (4yr. old has no idea who is he, but wanted the giant hammer) and a zebra. and my husband and i were kenny rogers and dolly parton for a party last weekend!
We’ll have an astronaut and an alien.
I’ve been wanting to make a lunch bag! I’d love to see what fabrics you’d pick for a masculine one…
My girls are going as witches for halloween, complete with capes from Sew Liberated patterns.
I’ll be following you now as well.
Love the lunch bag – what a great idea. I can’t help with the Halloween question – it is only just starting to become popular to celebrate in Australia.
Thanks for the giveaway
Love this lunch bag! I will only be handing out candy to the trick or treaters stopping by. Love to see the costumes!
I dont have little ones at home anymore, But my granddaughters are going to be Strawberry short cake, and a pumpkin. Thanks.
great tutorial. I tried to make one of these once and it didn’t turn out so good. Maybe I will try again. Love the look of this.
My daughter (9yrs old) is dressing up as a harlequin/pierrot in black and white. Costume made by mommy of course. Pattern Butterick B4319 (has other costumes in it also).
Thanks for the giveaway!
Great tut! This year I think I will probably be a “biker”. I drive a scooter so I was thinking I would wear my scooter helmet and make pleather chaps and a vest. Maybe I will even wear my safety glasses. It is sort of lame, but I don’t have much time left. I thought about going as a lego, but it would probably be too bulky for a party or difficult to make by Saturday. It would make a great kids costume though! Would be pretty easy to make a rectangle or square Lego or Duplo out of fabric or cardboard.
I’m also a follower. Great blog!
I’m planning on spending this Halloween hiding away in my craft room, doing what I like doing best….sewing! Hugs Naomi
Great tutorial – thanks for the gift idea. My grandaughters are 2 – one will be a bumble bee & the other a lady bug. Cute, cute, cute!
I’m a newbie follower…..grins
Hugs
Naomi
Pirates made from a McCalls pattern for toddler costumes!
My little ones have all flown the coop so no costumes this year. A favorite from years past was a pack of gum made with a box and some paint. Thanks for the lunch bag tutorial and a chance to win your giveaway.
I am a follower with RSS feeds.
we don’t generally do the Halloween thing around here but my daughter dressed as fancy nancy the other day for her school’s “dress like your fave book character” day.
she loved it!
My children are older, so no trick or treating this year. But I love getting out the costumes and remembering when they were lions, elephants, pilgrims, indians, Santa Claus, and Laura Ingalls! Some day, maybe I will have a reason to drag those costumes back out!
My kids are too big for me to make them costumes.
I’m so happy to find out about your etsy shop – almost ALL of my fabric shopping is done in etsy shops!
We don’t have any little ones to dress up for Halloween this year, but some memorable costumes from the past include a carrot (yes, a carrot. And that child grew up to be a dietician.) And now that I think of it, another memorable costume was my son dressed up as an ice cream sandwich. We had a local ice cream shop that made wonderful ice creams and was noted for their ice cream sandwiches. Hence the idea for the costume. I know we did other more traditional costumes, like pirates, ghosts, princesses, but the memories we especially treasure are from the more unique costume ideas.
Have fun!!!
No little one at home, she’s a Senior in college this year. I don’t even get any trick-or-treaters at the door! I might just treat myself to something nice and chocolatey at Starbucks.
Well, my baby (21 years old) is going to be a ballet dancer…but you are probably wondering what she was as a wee one. I made a bunny costume, a minnie mouse costume and a clown costume when my girls were little (1,2,3). They all wore them so they got some good use! Good memories!
Thanks for the fun lunch bag tutorial. Way to be ‘green’ for lunch.
I’m already a follower! Thanks!
Your little one is adorable and the picture is great.
thanks for the cute bag luch tutorial.
I follow your blog.Thanks for the chance.
Well I don’t have any kiddos at home anymore but we didn’t do Halloween. We had a tradition of camping out on the 3rd floor with candle light and chili and treats playing guessing games. It was a big favorite with my children. Thanks for the tutorial, very cute.
My seven year old granddaughter will be a witch this year. This is after being Darth Vader last year.
I just became a friend on Google.
I’m a new follower, as I just discovered you. I love the hair elastic idea. Great closure.
I am going to be a crazy cat lady. Today I need to sew all of the stuffed cats I’ve been gathering onto the leopard print bathrobe
My little one is going to be a little witch with a pointy purple hat–so cute!
I love your idea for up-cycling vinyl as a lunch tote liner! I can’t wait to try this. Thank you for the tutorial.
I’m thinking a rag doll.
I’m a follower!
and I just added your blog to my Google Reader.
both my girls are strawberry shortcake this year – it was actually a fairly simple costume to make (thank goodness!)
Cute project, and great blog!
My daughter is now 19 but when she was little I made Halloween costumes for a ballerina, Goldilocks, a fairy princess, a cat, a cheerleader, 50s girl (poodle skirt), Alice in Wonderland, Marilyn Monroe (that was in jr. high). This year she’s going as a Roy Lichenstein painting, but she’s away at university so she’ll have to put it together herself 🙂
I am a new follower!
Well, we don’t do halloween, so I guess we’ll just continue to be ourselves that day – lol. By the way, I love that you used regular fabric and added your own vinyl. I love the idea of using vinyl but hate that it is so expensive to buy the pre-made stuff, and then you are so limited by which fabrics are available. I’m definitely going to follow your lead on that!
i’m a follower. 🙂
I’m a new follower 🙂
my youngest is going to be a fireman – and the other two keep changing their minds, which i can’t handle. clock’s a ticking, people! 🙂
Thank you for the cutest little lunch bag tutorial ever!
I’m a follower.
First of all, your little helper is SOOOOOOO cute! And I love your tutorial! As to our Halloween costumes… my 4-year-old daughter is going as Peter Rabbit and my 2-year-old son is going as Benjamin Bunny. I’m almost finished making their costumes. I can’t wait to see them all dressed up! 🙂
I’m a follower. 🙂
My nephew is going to be a monster!
I dont have a little one but I remember when I was young my mom made me a crayon costume that I loved.
I am a follower
This link has some cute costume ideas: http://grosgrainfabulous.blogspot.com/2011/10/costume-ideas-5-tutu-fever.html
I’m a follower. OF COURSE!
What a cute lunch bag, love the recycled sheet bag idea 🙂 My kids costumes this year would be too scary for toddlers. When my son was 2 he was a mummy we used grey sweats wrapped in gauze and baby powder on his face, it was too cute. Thanks for the giveaway!!
We don’t do halloween so my suggestion is relax and let go of the pressure to do all the stuff.
I’m a follower!!
My 4 yr old says he will be Bumblebee from Transformers. Last year I bought about 4 costumes after Halloween on clearance and he’s been playing dress up off and on all year.
My middle boy is having surgery on nov 1st, 5 hours away so we are driving up on Halloween. No fun for trick or treating this year… But at least I don’t have to buy candy!
This is a wonderful tutorial and a good suggestion for using those vinyl bags. Thanks for the idea and the tutorial.
A monster and a monkey! (pretty accurate costumes actually!)
Alas, I have no little ones, but a grandchild is on the way and I look forward to sewing costumes for her in the future. We get so few children at our dark and out of the way neighborhood- it is a quiet night.
Great tutorial! My son is almost 2 and loves toy story, he’s going to be one of the little green Martian toys from the movie!
nice idea. great for cooking christmas gift! thank’s
Awesome tutorial. I love the idea of reusing the vinyl from linens. Excellent! My kids are going to be Luke Skywalker, Spiderman and Superman. I’m going to be SuperMom. 🙂 Thanks for the giveaway!
this is so cute! my little munchkin is going to be a doctor – i have her scrubs all sewn; now i just need to hem her lab coat…
I’ve enjoyed the blog hop. thanks for the lunch tutorial. We’ve never done Halloween but instead celebrate Reformation Day. i’d love to be entered for the giveaway.
My daughter is going to be one of the girls from Monster High. When she was that age, though, I made her the *most* adorable girl-clown outfit ever, and a matching dress for her doll.
I just became a follower! Love your bag!
For my second entry, I do not celebrate Halloween, but once in a while my big kids are home and will paint the younnger ones faces as cats, pirates and the like, just to go show the neighbors. That’s fun!!
I am a follower!
I have to work on Halloween. Boo! I won’t get to dress up. However I am considering wearing a princess crown to work!
I’ve got all boys so I’m not sure I’m much help in the costume department. I’m not sure where you live, but I always love the cozy fleece costumes from Old Navy. Perfect for trick-or-treating if it’s chilly! My littlest is going to be a dragon (from Old Navy) but they have the most adorable hamburger costume…they were out of my guy’s size, though! Good luck deciding and thanks for the giveaway!
I’m follower now, too! Thanks for the great tutorial.
My daughter is going to be a leopard and my son is going to be a pirate skeleton. Thanks for the giveaway and tute!
I am not dressing up to hand out candy, but some of the kiddos I know are going to be: witch, jem, little bo peep, with little sisters as sheep!
Cute lunchbox!
I am a new follower!
I am a current follower 🙂
No Halloween plans. Thank you for the tutorial and the giveaway. Have a great week!
My children are grown, so guess there won’t be any Halloween costumes around here. I really miss dressing them up. One year my daughter was Wonder Woman!
xsgail@gmail.com
I am following your blog!
Loving your lunch bag:) Congrats on the new baby, too:) Glad to hear that you are getting a bit of your energy back; the first few months are so draining, especially when you already have little ones to tend to!!! Thanks for the great tutorial.
Cute tutorial, thanks for sharing. This halloween I have no clue what I am going to do…sadly I don’t have any idea for halloween costumes. I’m thinking of hosting a murder mystery party. We’ll see what happens. Sorry I’m not much help! =)
ack! i have that vinyl in my closets too, never thought to use it!!
my daughter is going to be spiderman and my son…mostly himself, not a costume boy…but he has mentioned being a ghost.
i follow your blog
I’m a new follower. My 3 year old granddaughter will be Buzz Lightyear for halloween!!
That is so cute! My husband uses a fabric rice bag for his lunch, maybe he needs something nicer. With robots on it!
I am in quite the pickle. My son was going to be a hamburger last year for Halloween, but got sick the day of and we didn’t go. So….I planned on reusing his costume, but he really want to be a pirate this year, so do I buy him a new costume or use last years that still fits? So undecided…..
I’m a follower!
I don’t have kids and don’t dress up myself, so I’ll just wear my usual outfit – maybe that could be classified as crazy cat/sewing lady due to all the hair and thread shnibbles?
Cute, cute, cute thank you. We’re not dressing up this year, but the best family costume when my daughter was that age, was she was a dinosaur and we were cave people.
I love your little bag and LOVE that you used the recycled/upcycled plastic in the lining. I’m always throwing those bags away cuz I can’t think of what to use them for and they just take up room. Thanks.
I love this lunch bag! I need to make a couple for my kiddies, thank you. We don’t celebrate Halloween, so we will probably watch a movie with some yummy popcorn!
Fun lunch bag …really useful! Costume for me and maybe DGD a flapper..lots of motion and music!!
I’m a follower!
I want to dress up the dog as Camilla the chicken, but I don’t have the right costume.
We don’t celebrate Haloween in the Netherlands but we do celebrate Carnaval in Februari. We all dress up too for that. When I was little I loved my Holly Hobby costume. And I liked being a witch too. We have a dog, no children. I don’t dress up the dog but I do put him on one of those light reflecting yellow vests when we walk in the dark. It’s nog really dressing up but he does look like a construction worker wearing that 🙂
Thanks for the great tutorial!
Marieke
My 8 year old girl is going to be a “punk pirate” and my 6 year old is dressing up as a “rockstar” – fun!
And I am now a follower too!
I’m a new follower!
Love the lunch bag, thanks for sharing that project with us! I think I might be an angel this year. Or a gypsy.
beautiful project and tutorial-can’t wait to try it = thanks.
not sure about halloween costume yet, it’s narrowed down to vampire, pirate, fox, bird queen.
We don’t dress up. But for Purim maybe a princess!
oh and I’m a follower!
Hello, such a great tutorial and the picture of your daughter with the Halloween Oreo on her face is so precious. My little ones are 23 and 20 and they are a little neater when they eat their oreos…me not so much, especially when I am cramming them in my mouth because of their deliciousness. Not really, I do have some self-control!
Thanks for participating in the Christmas gift blog hop. It has been OUTSTANDING!!!
I just added your blog to my Google Reader. Thanks for sharing your creativity with all of us.
What a cute tutorial!! Thanks for the chance at a fun giveaway 🙂
My little one is going as a crayon! Too cute <3
I love those bags. Do you think if I used a laminate fabric on the inside it would be as easy to keep clean? I have never worked with either laminate or plastic before. Thanks for the tutorial.
Also – I am a follower. And I have NO IDEA what I am doing for Halloween. I have been so caught up in work that I cannot believe it is this late in the year already!
I have one child going as Super Girl and the other going as a witch! Thank you for the chance!
just found you through the other sites for the give away – count me in please – I will be back – you have some interesting things.
Karen
This is too cute! Thanks for the tutorial!
My grandchildren will be Power Rangers, a red one and a pink one! I will be a cat. I love how you lined that cute lunch sack. I have lots of those plastic bags lying around from sheets and blankets! Thank you.
I’m following with the RSS feed!
One daughter is Tweedledum (with a friend) and the other is a pirate. I think they’ll be cute!
I love the bag. Sorry no advice my girls are grown:(
We don’t have any kids at our house, just dogs. And because we live out in the country, at the end of a long, gravel drive, behind a locked gate, we don’t get any trick-or-treaters. So–I have nothing helpful to offer, but I did enjoy reading about “The Little Forrest”‘s dog looking like a construction worker in his safety vest. Thanks for the smile.
I’m a new follower–so glad to have found you!
We don’t celebrate Halloween…so won’t be dressing up as anything. However, my children love to play act and their latest kick is pretending to be Knights! =)
Thanks for a lovely giveaway!
Our neighborhood has long dark driveways on acreage so all the adults gather on one street for potluck. We all bring our candy with us and the kids all know where we are by now. It’s a blast!
I’m a new follower…I love your tutorial…and especially the little fussy cut center block! Great job. Thanks for taking time to share with us! =)
I’m a follower.
Nice tutorial. Thanks for the good gift idea.
I’ll be doing minimal trick or treating and then annual chili verde at a friends house.
This is adorable. I think I’ll try making one for my sweet two year old for snacks or lunch at the park. Do you thi I could use an oil cloth for the lining instead of fabric and vinyl?
Not sure that I’ll be dressing up this year, but a spider is always a great kids outfit – 3 pairs of black tights, 2 of them stuffed with old newspapers or other stuffing material and one pair for the child to wear on their legs! Take a long sleeved black t-shirt, fix the tops of the stuffed tights to the back of the t-shirt, attach the feet of the stuffed tights to strings (of 2 different lengths) so the child can work them like puppets. Then they can control all 8 of their spider legs!
And I’ve joined your lovley blog now too!
My little ones are a mouse and a bumble bee 🙂
ourbusylittlebunch(at)hotmail(dot)com
I follow 🙂
Cute bag!! I don’t have any kids, but would my cat’s costume count? 🙂 Another couple and my husband and I are going as Star Trek characters. I made a little matching dress for my cat, as well!
I am a follower! 🙂
My two-year-old is reusing his Dracula costume from last year, and my eight-month-old is using his brother’s old monster costume. I don’t have any Halloween costume creativity in me! 😀
My husband and I are going a 1920s themed Murder Mystery party so I’m making a little flapper onesie for my 3 month old daughter so we all match!
I follow your blog!
I love your little lunch bag. I’m making superhero costumes for my nieces and nephews–we’re going to have a regular justice league in our neighborhood for the holiday.
I’m a follower, too!
I am a brand new follower via Google Reader!
I am a new follower.
No one is dressing up for Halloween this year as my youngest is in college. but some of our costumes that they told me they loved are these. A ballerina or fairy and then they used the tutu for dress ups. A pirate. ANy kind of costume with a cape.Any character from the books we were reading. ANd one of my favorites, raggedy ann and my husband and I were raggedy ann and annie too. A whole family of us.
I’m a follower!
I like your lunch bags. I made a few of these many years ago, but mine were not as cute as yours and I never thought to add any vinyl. That would make them so much more stable and waterproof, too. Thanks for the tutorial.
I am a new follower.
I don’t have little ones anymore – 14 & 15-1/2 year old teenagers who probably won’t dress up. Thanks for sharing!
you run westwood acres? how cool- I’ve purchased from ya before!
LOOOOVE this tutorial… gonna try to whip one up for my little nieces!
new follower too!~
I am now a follower..
No little ones at our house currently … I will probably just put on my big Witch hat, DH may dress up or not but he likes to give out the candy. Thanks for sharing your project, and the giveaway!
My youngest is a jester this year….what a fun outfit!
Our downtown has safe treats for the kids every year….so we go there and the kids go from store to store and treat and socialize! All the outfits are so interesting!
Also now a follower!
No costumes for my “little ones” this year, as they are 18 and 22:-) (I’m happy not to be making costumes anymore!!) But in the past they’ve been M&M’s, Micky and Minnie mouse, a ballerina, a witch, Cinderella(that was one of the best! I made it out of an old negligee I bought from Salvation Army and then re-cut), batman (yes, she is a girl, but she was little enough to pull it off!), a generic princess, a warlock, and the Pokemon trainer boy(can’t remember his name) and Pocahontas. Sooo much sewing over the years: I always tried to talk my younger daughter to use one of her older sister’s old costumes, but it didn’t always work 😛 . anyway, it always gave them good dress-up clothes to play with!! Good luck with your little one: sure is a cutie!! Love that oreo face 😀 Went and checked out your ETSY site too: found some stuff I can hopefully get soon!!
Well, I don’t have a little one, but I do have a dog who is like my baby and he has a cute gladiator costume (my boyfriend and I have gotten into the show Spartacus) I made for him. Not sure what I’m going to be yet. Thanks for the tutorial!
My daughter and family are going to be Jake and the Neverland Pirates:) I made the costumes.. Grandma will hand out goodies!
Following your blog and Facebook:) I am excited:)
We’ll probably go trick and treating but not sure dressed up as what yet…
I love the lunch sack! Great idea for recycling the plastic bags too! I needed this tutorial–each one has been helpful. 🙂 Congratulations on your pregnancy! You daughter is precious!
Our Halloween costumes range from: M&M’s–vintage handmade costumes, Anikan Skywalker, Batman, and Super Woman–my daughter’s college dance costume and my dh is a prisoner because it cracks all of the kids up when he wears this and drags a ball around behind him on a chain and I don’t know what I am yet. My little “Skywalker” is usually a fireman, pirate, doctor or such but he turned six and is in love with Star Wars. He claims he is coming in to change six times so he can wear lots of costumes. lol We’ll see how that goes. He LOVES to dress up and entertain.
When I was a little girl your daughter’s age and my mom was pregnant, very pregnant I should add, my grandma dressed me up as a gypsy and used all kinds of her fabric scraps and wispy scarves–even some clip on earrings. I can remember every bit of her dressing me up and how much I laughed. Another year my other grandma used a white sheet and dressed me up as a “bitty boo”–a ghost. She painted my face white and put a pumpkin on each cheek. She used a cut down crib sheet gathered for the costume part and a halo of sparkly something or other. lol They were depression babies so you used what you had on hand for fun. Other memorable costumes with them were Shirley Temple, a hobo, a flying nun, The Hat Lady, and more. Very fond memories.
I hope your week is fantastic and filled with wonderful memories. 🙂
I liked your store on my favorites for etsy and added you to my RSS. 🙂
A cowboy. Thanks for the giveaway!
I don’t have any little ones now, but we get lots of children, big and small call here on Halloween. I just bought a huge orange bowl with black witches on it, to put all of the goodies I have bought, in it. I have a pumpkin that lights up, which sits on the steps, and a cardboard skeleton I hang outside the front door. 🙂
All my kiddies are grown up, so no trick or treating for us! It’s so sad when they leave. Good luck coming up with ideas! Thanks, too for the chance to win-your shop looks awesome!
We won’t be doing much for Halloween. We live way out in the country so we don’t have trick or treaters. My kids are all grown up and out of the house too.
I follow you too!
I am a new follower. thanks for the giveaway and your little bag is a great idea.
I like your typewriter font it takes me back.. also like to say hi! I’m new on your list of followers and glad to have bumped into you by way of this awesome as you rightly say, blog hop..met some wonderful bloggers and have yet another neat idea today too!! thank-you so much. As for your dear child…those eyes! I cant suggest anything constructive as I have never liked the ugliness of that celebration, it jars me… but there are so many other lovely things for our children to think of and do and enjoy. hugs
What a lovely tute 🙂 My little lady is going to be a witch (again, her favourite!) and my little boy wants to go as Spiderman. Not very halloween but if it makes him happy…
I would like to make one of your lunch sax for my DH too, It’s great to see the newer prints incorporated into a block in that way, quite refreshing. I like your work!
I am a new follower via Google Reader 🙂
back in the day, a long time ago, we would take our little ones trick or treating in the neighborhood; such fun! much goodies! now, there are no trick or treaters … all the little ghosties and gremblins go to a big community haloween bash for fun and games, treats and prizes.
i’m now one of your new followers!
What a great idea for use of the sheet packages! I keep those too, and have used them for many things, including quilt blocks and fabric set apart for a particular quilt. For halloween, I’m being frugal and using what I have for 2 kids (Belle dress-up outfit, and Larry Boy costume), and the 3rd kid will be a pirate wince we already have the eye patch and I can make up the rest!
We’ve got a Jedi knight and a princess for Halloween. Not very creative, but free!!
I have a cape that I use for most of my costume that I use each year. It’s some sort of iridescent fabric. I add different things each year to make it a costume – last year it was covered with fake autumn leaves – added a leaf wreath on my head and I was good to go. Thanks for the chance to win!
Hello Amanda. Thank you for the nice tutorial. What a nice blog you have! I kept on reading. I’m from the Netherlands and we dont dress up for Halloween. Some primary schools do, but not the school of my boys.
We’ve never done the Halloween thing. Love your lunch sack! Thanks for the tutorial and giveaway. And your little helper is very cute, too! 🙂
Already a follower. 🙂
Really cute! My son is 8, so he’s still little enough for Trick or Treating. He wants to be a ninja or a spy. My daughter is 13, so too old for it. I’d love to have a Halloween party for her and some of her friends, if only our house was big enough. Halloween is so fun when kids are little, and there’s so many cute costume options for little girls, especially.
very cute! thanks for the tutorial.
I was ecstatic when 3 of my grandkids wanted to use costumes from my dress=up box for Halloween. One took a tango costume but she’s going to add a witch hat and makeup. She’s 7. the 8 year old took my vampire costume, worn by 3 boys many, many times. And the 4 year old found a red jumpsuit with a little devil cape. He was unhappy because I had lost the pitchfork. (Many years ago). Smart use of the plastic bags in your tut. Thanks.
First of all, your toddler is just gorgeous! And what a beautiful shot of her. 🙂 My toddler and I are going to be witches. She did not want to be a princess or anything else I showed her so I finally just bought her a witch costume. The best part? the fabric is soft and fuzzy and not the itchy junk that most costumes are (and she won’t wear!).
I’m a follower! 🙂
This is a wonderful tutorial! Now I know what to do with those vinyl bags in MY closet. :o) Thank you for the wonderful giveaway too.
I am going to sit on my front porch, and give the tricksters some candy corn and fresh red apples., and admire their costumes.
How sweet and I need a lunch bag too! thanks for the tutorial. I am being a witch! my kids are older – the college daughter is going to be Clifford the Big Red Dog though 🙂 thanks!
I am a follower too! thanks again!
I am a new follower, so pleased to have found a new blog through Ellison Lane.
I don’t have any little ones, just a 5 1/2 yr old nephew, he is going to be Optimus Prime. I went out for Halloween until I was about 16 years old, it was pretty awesome. We had the excuse of taking the younger kids.. I’m short and I still get carded (I’m 31) so I could still get away with it then. My Mom used to make our costumes and they were great 🙂 Thanks for sharing your tutorial! I’m glad I’m not the only one that saves those sheet things, I also use the zippers, they are nice and long!
I’m also a follower.
While I don’t have little ones, my grandnieces that are old enough are going as Storybook Princess and Bat-a-rina.
We don’t celebrate Halloween but for costume ideas, why not go with something easy like a lego brick – cardboard box with round boxes glued on to make the bumps. Or a ghost, witch or bear. Circus performers are fairly easy too – bathers and fancy hair pieces.
Good luck hope you work something out in time.
This is totally adorable and I love the focus in the star, thank you!
What a cute lunch sack! I love it! Also, anything with Heather Ross fabrics is guaranteed to be wonderful! 🙂
My 7 year old is going to be a Ninja, my 5 year old a King, my 2 year old Rapunzel, and my 1 year old a Dragon! Good luck thinking of a costume for your adorable little sweetie!
thanks for the tutorial amanda – its great and I can even try vinyl – as for halloween – I do love a good witch costume 🙂
here’s my second comment – I’m a follower which is how I found out about this great blog hop – many thanks
The lunch bag is cute but it’s the “Halloween Helper” that made my day.
OOps! I forgot to answer the question. My darling grand-daughters are celebrating as a Princess Warrior and a Mermaid.
Halloween isn’t really celebrated much here in Australia, so there won’t be any parties, but my son loves dressing up, so i think we might make a simple ghost or pirate costume and have a play at home 🙂
Great tutorial, Manda! Love it. And I’m glad I checked out your blog so I could participate in all the other great tutorials on the Hop.
And can I just say that based on that picture of your little sweetheart, maybe she should dress up as an Oreo for Halloween!
Of course I’m a follower!
I have a fireman and one that doesn’t know yet either… And to think I was going to sew him a costume (I’ve been asking for 2 months…) My favorite costume for a toddler (and my son loved it) was a pumpkin – he actually liked it so much that he wore it for 2 years. 🙂
I am a follower already via gfc!
Well, what I’m going to be won’t help your toddler, but the funniest toddler costume idea I’ve seen was a little kid dressed up as a lobster and carried around in a big cooking pot. (Of course, this requires a lot of effort on the part of the pot carrier!).
love the tut! I will be a witch – like always. grands expect it now. I wear the same hat with feathers. all my children are grown. so not sure what they will be doing. saturday we will have a family party with all the grands. games, food and a pinata and they all come dressed up. fun, fun, fun!
Lorene
Great tute! My little girl is just 11 weeks old, but her daddy will dress her up in a cupcake costume and take her trick or treating around his office this Friday. He’s been handing out candy to his coworkers’ kids for five years and feels like it’s his turn to get candy now. 🙂
I now am a follower on facebook. I LIKE you!
Lorene
I’m dressing my cat Max as a stegosaurus. He will hate me, but it will be worth it for the pictures!
I made my granddaughter a scarecrow costume. She will be wearing it tomorrow for the first time to the nursing home where her mother works. I can’t wait to see her in it-she didn’t love it when she first saw it and at two that may be a problem! LOL
I am a follower.
very cute bag 🙂 thnaks for sharing with us
My little ones are all grown up so I don’t have any costumes to make anymore. One of my favorite costumes was for my youngest son, he was a bumble bee. He was soooo adorable. Maybe his friends at college would like to see a picture of him in that cute costume.
We don’t celebrate Halloween, but my favorite costume was a wind-up doll costume. Thanks for the giveaway.
My little ones are actually big ones but I understand that one is going to be Gordon Ramsey and the other a Peacock. : )
My granddaughter will be ballerina.
I am a follower.
My toddler is going to be a fireman with a hat & jacket I bought at Target. We just moved and I ran out of time for sewing a homemade costume. It was more $ than I wanted to spend, but seems durable enough to play dress up with until he outgrows it and probably hand down to younger siblings.
I am a follower! Thanks for the chance to win!
My “little” ones are all over the age of twenty now. Sniff. No costumes around here. But I think your little sweetheart would make a great Tinkerbelle! It’s easy to put that together with just a little tulle and a wand and a cloth pouch for fairy dust!
We are a bit old around here for trick or treating but past costumes for my girls were an artist (smock, cardboard paint board, brush, beret), a girl in a bathtub (shower cap, white balloon bubbles, back scrubber, rubber duck, cardboard bathtub), a witch, etc. We were big into make your own costume. Love your tutorial and blog and would love a gift certificate to your shop.
I’m a new follower.
This bag is so cute! Love the star focus!
What a great tute. My husband could really use a lunch bag. Thanks for sharing the idea! 🙂
I’m not sure we have anything planned as it’s school holidays this week and the rest of the family are visiting the in laws.
DH and I will carve the pumpkin and put it in the window with a glowing candle, and we’ll fill the bowl with candy bars, and maybe I’ll hang my witch wall hanging up on the door…..and probably noone will come because we haven’t see any kids for the last couple of years. Too far in the country to make the trek. Oh well we get to eat lots of chocolate 🙂
Great idea. I could definitely use at least 2 of these. Thanks for the tutorial.
I plan to give away a ton of candy to trick-or-treaters and carve a pumpkin or two beforehand. Then I plan to devour any candy not claimed by said trick-or-treaters and maybe get a bit of a sugar rush. 🙂 Thanks for the great tutorial!
I am also a follower!
Great tutorial–thanks! We’ve got an 11 year old boy who is going to be an evil gnome. Most of the costume (mask and shirt) came from a package, but we’ve added some accessories to make it extra scary!
And I’m now a follower too!
We don’t really celebrate Halloween here. But I think little bug (ladybug, bumblebee etc) costumes are always cute on toddlers.
Thanks for a great tutorial and giveaway 🙂
Well my son is way to big for halloween however, he is still dressing up for big kids parties! I always made his costumes though….one of my favorites was a scarecrow…with felt for the straw part sticking out of the sleeves and collar, legs, etc. It was so cute with patches on the shirt & pants. It was simple but so adorable. BTW your daughter is adorable!!
I am follwer, love the tutorial and plan to make the bag! thanks!
My “little one” is all grown up but when he was about 2 or 3 I made him a penguin costume. It is still one of my favorites of all the many costumes I’ve made over the years.
What a nice lunch bag. Thank you.
If we would celebrate Halloween I`d like to make some of those great Harry Potter costumes (not Harry Potter himself, but may be the aunt who became a balloon?).
Greetings from Silke
I`m a new follower, Amanda,
I like what you`re doing. And thank you for the chance to win!
Thank you for sharing your project. My son is 20 & who knows what he will be doing on Halloween, but my 10 mo old, 70 lb, Goldendoodle Pup, Riley is going to dress up as a ballerina. 😉
I love how you upcycled the vinyl. I have so many of those sheet pouches in my closet just waiting for a project to come along. I never thought about using them like you did. Genius!
I am totally a follower now! I’m not sure how I’ve never found you before! I forgot to tell you in my first comment, but my 4 year old and 2 year old are going as construction workers and the baby will be a skunk. Last year we had a chicken and a frog. So cute!
I have been wanting to make one of these for ages. I love your tutorial and now I feel like I will go for it! Thanks for the great giveaway!!
Oops, hit return before finishing my comment. My littlest one will be a carrot this year and I will be a gardener!
I also just added you to my reader, really great blog!
thanks for the tutorial and sweet giveaway.
also, i love your comment form (font). 🙂
I think this year I am going to play safe and become a witch. Having left it late I don’t have much time to put it together.
I am now following your blog with GFC
I am a new follower. Great tute, Amanda. Your little girl is soooo adorable!
My little boy (4 years old) is going as a red guitar for halloween. He is sooooooo excited!
Cute – thanks for sharing! I love the idea of reusing those vinyl packages!
I saw a really cute idea! The little girl was a crab and she had a pot with the bottom cut out that was held up with suspenders. She was so cute!
I follow your blog 🙂
The 9 year old daughter decided she wanted to be a “regular” witch (we did Harry Potter inspired outfits last year so wanted to differentiate between an HP witch versus a ‘regular’ witch!) and the 5 year old son is a Transformer. I made their costumes last year but just went the bought route this year!
I have no idea how you could even sew (much less something as adorable as this lunch sack) with that darling little helper. She is totally adorable.
This looks like a fun crafternoon project for a group of friends!
I really appreciate the idea!
Thanks for sharing this great tutorial (and your little angel) with us.
And thanks for the fun chance on your giveaway.
Cute bag! Even cuter assistant! 🙂 Thanks for sharing this great tute!
My grandaughter is going as little red riding hood this year for Halloween. Thanks for the giveaway.
Lovely lunch sack, thank you so much for the tutorial.
My husband and I are going as ghosts, easy peasy is my motto. Actually we only go to one house, our friend, who has the best candy ever.
Your lunch bag is cute. Clever use of the vinyl bags.
Thanks for the inspiration
I’m a new follower. Thanks for the tutorial & giveaway.
My husband & I will dress up as a banker & librarian for Halloween. I’ve always hated throwing away those vinyl bags so I have a small collection of them. Thanks for showing me that I can cut & sew them. Also thanks for the giveaway.
Angelina Ballerina is what my 2 and half year old is going to be.
I have three boys, and the running joke is that walking into our house is like arriving at a (ahem) sausage party! So my baby will be of course going as a hotdog. The bigger boys are going as knights (it was the plastic sword that sold them!).
And, I am a new follower of the blog!
My toddler has decided to be a “gray moth” for Halloween this year. Last year, my boys dressed as soda cans.
I think they were cute.
My oldest is going as a non-sparkly vampire (meaning the normal Dracula kind). I get to make his cape for this which I have cut out and waiting to sew. My younger son is wearing a Boba Fett (forgive the spelling) costume my mom found at a yard sale for $1 and he’s happy. I think I’m going to be Katy Perry 🙂
I’m a follower.
thanks for the tutorial, might just try this one
Sorry no Halloween ideas here – I too am looking for something. I really like the idea of upcycling those bags I have saved for the lining of the lunch sack. I will be making a bag or two myself.
CUTE bag! I love it! Thanks for the great tutorial and generous giveaway! Halloween… I haven’t even thought about it too much yet. How many days away is it now?? 😉 My little 6 month old girl is going to be a pink butterfly. My oldest son (3yrs) wants to be a “toy”. 🙂 But when I ask what toy he says he wants to be a monster. My second boy (2yrs) is going to be a scarecrow. (Well, now that I say that, my oldest wants to be a scarecrow too. lol. I guess we’ll see what happens when it’s time to dress up!) 🙂
I am very happy to be a new follower! Cute blog! 🙂
Thank you for this! My kids have a strange fascination with lunch bags for some reason. I can totally make them their own now!
My kiddos are going as a gangster (his choice, not mine) a rabbit (easy and super cute) and a dinosaur (cute, not scary)~
Good luck with your costumes!
Amy
I am always a witch, my son will be some raggedy soul fresh from the grave, I’m sure. Love the little bag. Thanks for the vinyl idea.
I would LOVE to win gift cert from your shop:) You are doing what I dream of doing!! Fabric shop – yes please!! Beautiful fabric you have! I loved the little guy dressed as a bum on pinterest holding a cardboard sign that says will work for candy:)
I’m a new follower – via google reader!!
This is a great tute! 🙂 Sorry no ideas for you for halloween. We’ll just be hanging out as a family. 🙂
We also have no idea!!!! I feel like such a procrastinator! LOL. Please enter me! I love your shop!
Crystal at domesticbutnotmartha dot com
Love your bag especially reusing the bag from some curtains or linens. My husband & I will be going over to our daughters to hand out the goodies while she and her hubbie go out with our 4 grandbabies. I have no idea what they are going to be yet.
Have really loved all of the tutorials – and thank you for your participation. Great tutorial. JudyCinNC
I just found your blog stumbling around on the computer and just love it!
This is a great tutorial, going to have to make it for me!
And I just joined your site ~ plus I’ve got it on my page to follow everyday1
No kids for me…and I don’t currently believe in dressing up my puppy Jesse (a miniature dachshund)…I love the tutorial and love that you used an old linen bag for the lining. Thanks for the tutorial and giveaway.
We have an around the world theme going this year: the kids will be ancient Egyptian, Irish, Chinese, Native American, and French. My husband who hates dressing up will be a Spaniard (“Hello my name is Inigo Montoya” name tag) and I’m still trying to decide where to be from. Maybe just a tourist?
My little ones are not so little. My 13 year old is going to be a Barbie Doll, by 11 yr old a Zombie. Thank you for the great tutorial.
I am now a follower. Happy to have the chance to learn from you and get to know you.
My 4 yr old son informed me last week that he’s thinking about being a tree. “Not just any tree, Mama. A leafy tree with a bird’s nest with a Momma bird and her chicks. Oh, and a coupla squirels.”
hmmmm perhaps the visit to the nature center should have been AFTER Halloween! Good luck with your costuming!!
I am a new follower. Wow, 485 followers. Almost to that great 500 number!!!!!! Congrats!
Thanks for the tutorial and great giveaway!
I love this little lunch sack! It would be great for us to go to the park with! My boys are going to be Thing 1 and Thing 2 from Dr. Seuss’s Cat in the Hat.
Now Following 🙂
Love the bag. I just started a new job and pack my lunch every day, so I’m definitely going to need to make this for myself!
I’m a follower!
Great tutorial! Such a cute little bag!
I’m a happy new follower!
I don’t have little ones but I do have a witch’s hat that I will wear to great the little ones.
I am a new GFC follower!
What a cute lunch sack. What a great tip to use the plastic that is from those bags. I think everybody has one of those. Thanks for the tutorial, great job. My children are grown so I don’t have small children that are dressing up. I love sitting out front, watching all the kids and passing out candy.
Thanks for the giveaway and a chanc to win.
usairdoll(at)gmail(dot)com
I am a happy follower.
Thanks for a chance to win.
usairdoll(at)gmail(dot)com
Haloween we see me in hospital impersonating Frankenstien as they repair a hernia. Ah making lemonade.
Nice lunch bag yumm
I have a little nephew that is going to dress up like Mickey Mouse. He is going to be soooo cute, or I should say cuter! lol
Your lunch bag is so cute. I love how you fussy cut the center. Thanks for the giveaway.
Yes, I’m a follower of your blog. A new one. Thanks againg for the giveaway.
Hi – we’re doing nothing for Halloween! I guess I think it’s a load of nonsense and a waste of time, money and energy! Bah humbug! Hope that doesn’t cancel out my entry!
I’m a follower too!
My newphew wants to be a pumpkin. Thanks for the tutorial on such a cute lunck sack.
Great tutorial- thanks for sharing! When my daughter was little, one year she went as Raggedy Ann for Halloween. She looked adorable! Her aunt had made her the Raggedy Ann doll and she carried that with her. Happy memories!! 🙂
I’m a follower. Thanks for the giveaway!
Great post! My daughter is all about princesses, so she is going to be Cinderella…and a fairy princess this morning for dance class. 🙂
Cute bag! Thanks for the tutorial.
What a cute bag, Think I’ll make them for the grandkids.
This halloween my kids are going to be an Army Ranger and a Banana. Too funny!
When my girls were toddlers they were princesses and fairies. We usually just trick or treat family and friends and their buckets were always full. This year we will be attending a Harvest Party, followed by a pizza and movie at home.
We are going to a neighbour’s halloween party and some trick-or-treating (if it doesn’t rain). Thanks for the chance to win! 🙂
I’m a new follower
I don’t have human kids, but my kitty is going to be dressed up as a shark! I found a fantastic costume at Target and am so excited to try to get her in it 🙂
I am a new follower and have decided that I have to start making a list of projects that I WANT TO DO along with my other have to’s – this is #1 on my list – thanks.
Thanks for the tutorial! And thanks for the chance to win – your shop has some great stuff! My daughter wants to be Rapunzel which is just a pretty dress and a bulky braid of yarn and ribbon around her head with a long braid hanging down – easy!
I’m going to sit in a dark house and eat Halloween candy :_) . The last time I opened the door to trick or treaters they were bigger than me.
I’m a follower…….thanks for a chance to win!
What a great tutorial. That FFAIII print is so cute that I may even make one to match it!
My daughter wants to be a pumpkin fairy for halloween 🙂
Thanks for the wonderful giveaway.
I’m a happy follower 🙂
Brilliant! I just threw one of those vinyl thingers away last weekend- it never fails- as soon as I get rid of something, I find a use for it. I love the way you upcycled it into such a stylish bag. And your fabric choices are great. Love it!
I love your tutorial. I’m a little lazy, so will be making one star, lol, and leaving the other side blank 😉 But then, hey, I can make two!! Thanks for the time spent on this, and for the extra give-away 🙂
barzi10091-at-aol-dot-com
I have also followed you on Google Reader 🙂
barzi10091-at-aol-dot-com
Thank you for the fabulous tutorial! Have fun at your party tonight!
I’m a follower. 🙂
cute lunch sack! If we celebrated halloween I’d dress my girl as little red riding hood
ps. I’m a brand new follower!
Oh so cute! I make my daughter a new lunch box every year for school and I’m always looking for cute lunch box/bag tutorials. I love yours! Especially how you used the clear vinyl with cute fabrics. I hate how much oilcloth costs, and you’ve come up with a perfect solution. THANKS!!
This is lovely! As for Hallowe’en…I’ll be home giving out candy! I don’t have kids of my own, so it’s the only way to see all the cute costumes!
What a great bag and what a sweet helper! Thanks for the giveaway!
I’m a follower too, thanks!